Showing posts with label Programming. Show all posts

Saturday, 9 May 2015

Types of Research

Quantitative research

Quantitative research is generally associated with the positivist/postpositivist paradigm. It usually involves collecting and converting data into numerical form so that statistical calculations can be made and conclusions drawn.

The process

Researchers will have one or more hypotheses. These are the questions that they want to address which include predictions about possible relationships between the things they want to investigate(variables). In order to find answers to these questions, the researchers will also have various instruments and materials (e.g. paper or computer tests, observation check lists etc.) and a clearly defined plan of action.
Data is collected by various means following a strict procedure and prepared for statistical analysis. Nowadays, this is carried out with the aid of sophisticated statistical computer packages. The analysis enables the researchers to determine to what extent there is a relationship between two or more variables. This could be a simple association (e.g. people who exercise on a daily basis have lower blood pressure) or a causal relationship (e.g. daily exercise actually leads to lower blood pressure). Statistical analysis permits researchers to discover complex causal relationships and to determine to what extent one variable influences another.
The results of statistical analyses are presented in journals in a standard way, the end result being aP value. For people who are not familiar with scientific research jargon, the discussion sections at the end of articles in peer reviewed journals usually describe the results of the study and explain the implications of the findings in straightforward terms

Principles

Objectivity is very important in quantitative research. Consequently, researchers take great care to avoid their own presence, behaviour or attitude affecting the results (e.g. by changing the situation being studied or causing participants to behave differently). They also critically examine their methods and conclusions for any possible bias.
Researchers go to great lengths to ensure that they are really measuring what they claim to be measuring. For example, if the study is about whether background music has a positive impact on restlessness in residents in a nursing home, the researchers must be clear about what kind of music to include, the volume of the music, what they mean by restlessness, how to measure restlessness and what is considered a positive impact. This must all be considered, prepared and controlled in advance.
External factors, which might affect the results, must also be controlled for. In the above example, it would be important to make sure that the introduction of the music was not accompanied by other changes (e.g. the person who brings the CD player chatting with the residents after the music session) as it might be the other factor which produces the results (i.e. the social contact and not the music). Some possible contributing factors cannot always be ruled out but should be acknowledged by the researchers.
The main emphasis of quantitative research is on deductive reasoning which tends to move from the general to the specific. This is sometimes referred to as a top down approach. The validity of conclusions is shown to be dependent on one or more premises (prior statements, findings or conditions) being valid. Aristotle’s famous example of deductive reasoning was: All men are mortal Ă Socrates is a man Ă  Socrates is mortal. If the premises of an argument are inaccurate, then the argument is inaccurate. This type of reasoning is often also associated with the fictitious character Sherlock Holmes. However, most studies also include an element of inductive reasoning at some stage of the research (see section on qualitative research for more details).
Researchers rarely have access to all the members of a particular group (e.g. all people with dementia, carers or healthcare professionals). However, they are usually interested in being able to make inferences from their study about these larger groups. For this reason, it is important that the people involved in the study are a representative sample of the wider population/group. However, the extent to which generalizations are possible depends to a certain extent on the number of people involved in the study, how they were selected and whether they are representative of the wider group. For example, generalizations about psychiatrists should be based on a study involving psychiatrists and not one based on psychology students. In most cases, random samples are preferred (so that each potential participant has an equal chance of participating) but sometimes researchers might want to ensure that they include a certain number of people with specific characteristics and this would not be possible using random sampling methods. Generalizability of the results is not limited to groups of people but also to situations. It is presumed that the results of a laboratory experiment reflect the real life situation which the study seeks to clarify.
When looking at results, the P value is important. P stands for probability. It measures the likelihood that a particular finding or observed difference is due to chance. The P value is between 0 and 1. The closer the result is to 0, the less likely it is that the observed difference is due to chance. The closer the result is to 1, the greater the likelihood that the finding is due to chance (random variation) and that there is no difference between the groups/variables.

Qualitative research

Qualitative research is the approach usually associated with the social constructivist paradigm which emphasises the socially constructed nature of reality. It is about recording, analysing and attempting to uncover the deeper meaning and significance of human behaviour and experience, including contradictory beliefs, behaviours and emotions. Researchers are interested in gaining a rich and complex understanding of people’s experience and not in obtaining information which can be generalized to other larger groups.

The process

The approach adopted by qualitative researchers tends to be inductive which means that they develop a theory or look for a pattern of meaning on the basis of the data that they have collected. This involves a move from the specific to the general and is sometimes called a bottom-up approach. However, most research projects also involve a certain degree of deductive reasoning (see section on quantitative research for more details).
Qualitative researchers do not base their research on pre-determined hypotheses. Nevertheless, they clearly identify a problem or topic that they want to explore and may be guided by a theoretical lens - a kind of overarching theory which provides a framework for their investigation.
The approach to data collection and analysis is methodical but allows for greater flexibility than in quantitative research. Data is collected in textual form on the basis of observation and interaction with the participants e.g. through participant observation, in-depth interviews and focus groups. It is not converted into numerical form and is not statistically analysed.
Data collection may be carried out in several stages rather than once and for all. The researchers may even adapt the process mid-way, deciding to address additional issues or dropping questions which are not appropriate on the basis of what they learn during the process. In some cases, the researchers will interview or observe a set number of people. In other cases, the process of data collection and analysis may continue until the researchers find that no new issues are emerging.

Principles

Researchers will tend to use methods which give participants a certain degree of freedom and permit spontaneity rather than forcing them to select from a set of pre-determined responses (of which none might be appropriate or accurately describe the participant’s thoughts, feelings, attitudes or behaviour) and to try to create the right atmosphere to enable people to express themselves. This may mean adopting a less formal and less rigid approach than that used in quantitative research.
It is believed that people are constantly trying to attribute meaning to their experience. Therefore, it would make no sense to limit the study to the researcher’s view or understanding of the situation and expect to learn something new about the experience of the participants. Consequently, the methods used may be more open-ended, less narrow and more exploratory (particularly when very little is known about a particular subject). The researchers are free to go beyond the initial response that the participant gives and to ask why, how, in what way etc. In this way, subsequent questions can be tailored to the responses just given.
Qualitative research often involves a smaller number of participants. This may be because the methods used such as in-depth interviews are time and labour intensive but also because a large number of people are not needed for the purposes of statistical analysis or to make generalizations from the results.
The smaller number of people typically involved in qualitative research studies and the greater degree of flexibility does not make the study in any way “less scientific” than a typical quantitative study involving more subjects and carried out in a much more rigid manner. The objectives of the two types of research and their underlying philosophical assumptions are simply different. However, as discussed in the section on “philosophies guiding research”, this does not mean that the two approaches cannot be used in the same study.

Pragmatic approach to research (mixed methods)

The pragmatic approach to science involves using the method which appears best suited to the research problem and not getting caught up in philosophical debates about which is the best approach. Pragmatic researchers therefore grant themselves the freedom to use any of the methods, techniques and procedures typically associated with quantitative or qualitative research. They recognise that every method has its limitations and that the different approaches can be complementary.
They may also use different techniques at the same time or one after the other. For example, they might start with face-to-face interviews with several people or have a focus group and then use the findings to construct a questionnaire to measure attitudes in a large scale sample with the aim of carrying out statistical analysis.
Depending on which measures have been used, the data collected is analysed in the appropriate manner. However, it is sometimes possible to transform qualitative data into quantitative data and vice versa although transforming quantitative data into qualitative data is not very common.
Being able to mix different approaches has the advantages of enabling triangulation. Triangulation is a common feature of mixed methods studies. It involves, for example:
  • the use of a variety of data sources (data triangulation)
  • the use of several different researchers (investigator triangulation)
  • the use of multiple perspectives to interpret the results (theory triangulation)
  • the use of multiple methods to study a research problem (methodological triangulation)
In some studies, qualitative and quantitative methods are used simultaneously. In others, first one approach is used and then the next, with the second part of the study perhaps expanding on the results of the first. For example, a qualitative study involving in-depth interviews or focus group discussions might serve to obtain information which will then be used to contribute towards the development of an experimental measure or attitude scale, the results of which will be analysed statistically.

Advocacy/participatory approach to research (emancipatory)

To some degree, researchers adopting an advocacy/participatory approach feel that the approaches to research described so far do not respond to the needs or situation of people from marginalised or vulnerable groups. As they aim to bring about positive change in the lives of the research subjects, their approach is sometimes described as emancipatory. It is not a neutral stance. The researchers are likely to have a political agenda and to try to give the groups they are studying a voice. As they want their research to directly or indirectly result in some kind of reform, it is important that they involve the group being studied in the research, preferably at all stages, so as to avoid further marginalising them.
The researchers may adopt a less neutral position than that which is usually required in scientific research. This might involve interacting informally or even living amongst the research participants (who are sometimes referred to as co-researchers in recognition that the study is not simply about them but also by them). The findings of the research might be reported in more personal terms, often using the precise words of the research participants. Whilst this type of research could by criticised for not being objective, it should be noted that for some groups of people or for certain situations, it is necessary as otherwise the thoughts, feelings or behaviour of the various members of the group could not be accessed or fully understood.

Vulnerable groups are rarely in a position of power within society. For this reason, researchers are sometimes members of the group they are studying or have something in common with the members of the group.

How To Create a Sharded Cluster in MongoDB Using an Ubuntu 12.04 VPS

Introduction

MongoDB is a NoSQL document database system that scales well horizontally and implements data storage through a key-value system. A popular choice for web applications and websites, MongoDB is easy to implement and access programmatically.
MongoDB achieves scaling through a technique known as "sharding". Sharding is the process of writing data across different servers to distribute the read and write load and data storage requirements.
In a previous tutorial, we covered how to install MongoDB on an Ubuntu 12.04 VPS. We will use this as a jumping off point to talk about how to implement sharding across a number of different nodes.

MongoDB Sharding Topology

Sharding is implemented through three separate components. Each part performs a specific function:
  • Config Server: Each production sharding implementation must contain exactly three configuration servers. This is to ensure redundancy and high availability.
Config servers are used to store the metadata that links requested data with the shard that contains it. It organizes the data so that information can be retrieved reliably and consistently.
  • Query Routers: The query routers are the machines that your application actually connects to. These machines are responsible for communicating to the config servers to figure out where the requested data is stored. It then accesses and returns the data from the appropriate shard(s).
Each query router runs the "mongos" command.
  • Shard Servers: Shards are responsible for the actual data storage operations. In production environments, a single shard is usually composed of a replica set instead of a single machine. This is to ensure that data will still be accessible in the event that a primary shard server goes offline.
Implementing replicating sets is outside of the scope of this tutorial, so we will configure our shards to be single machines instead of replica sets. You can easily modify this if you would like to configure replica sets for your own configuration.

Initial Set Up

If you were paying attention above, you probably noticed that this configuration requires quite a few machines. In this tutorial, we will configure an example sharding cluster that contains:
  • 3 Config Servers (Required in production environments)
  • 2 Query Routers (Minimum of 1 necessary)
  • 4 Shard Servers (Minimum of 2 necessary)
This means that you will need nine VPS instances to follow along exactly. In reality, some of these functions can overlap (for instance, you can run a query router on the same VPS you use as a config server) and you only need one query router and a minimum of 2 shard servers.
We will go above this minimum in order to demonstrate adding multiple components of each type. We will also treat all of these components as discrete machines for clarity and simplicity.

Set Up Initial Base Image

To get started, install and configure an initial MongoDB server on Ubuntu using this guide. We will use this to bootstrap the rest of our sharding components.
When you have finished that tutorial for your first server, shut down the instance with this command:
sudo shutdown -h now
Now, we are going to take a snapshot of this configured droplet and use it to spin up our other VPS instances.
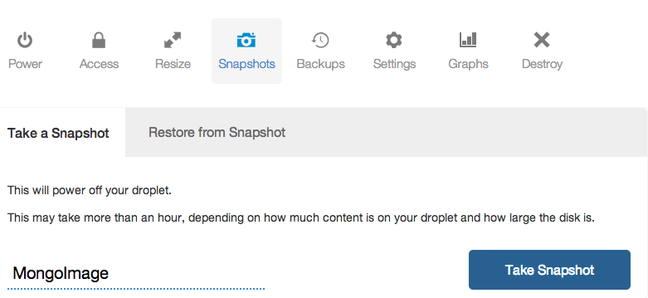
In your DigitalOcean control panel, select the droplet. Click on the "Snapshots" tab. Enter a snapshot name and click "Take Snapshot":
DigitalOcean take snapshot
Your snapshot will be taken and the initial server will be rebooted.

Spin Up VPS Instances Based on Snapshot

Now that we have an image saved through the snapshot process, we can use this as a base for the rest of our MongoDB components.
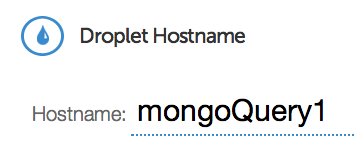
From the control panel, click on the "Create" button. Enter a name that describes the purpose that your droplet will have in the sharding configuration:
DigitalOcean name droplet
Select the droplet size and the region. It is best to choose the same region for all of your components.
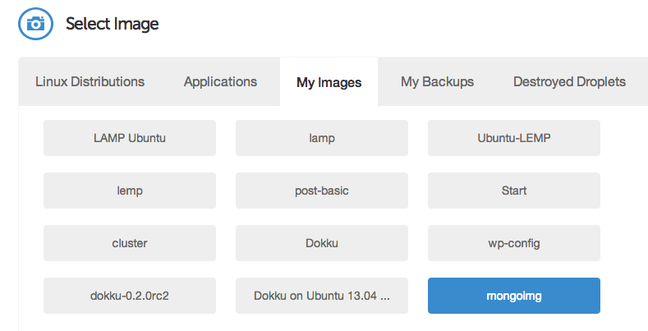
Under the "Select Image" section, click on the "My Images" tab and select the MongoDB snapshot you just created.
DigitalOcean select image
Add any SSH keys you need and select the settings you would like to use. Click "Create Droplet" to spin up your new VPS instance.
Repeat this step for each of the sharding components. Remember, to follow along with this tutorial exactly (not necessary, but demonstrative), you need 3 config servers, 2 query servers, and 4 shard servers.

Configure DNS Subdomain Entries for Each Component (Optional)

The MongoDB documentation recommends that you refer to all of your components by a DNS resolvable name instead of by a specific IP address. This is important because it allows you to change servers or redeploy certain components without having to restart every server that is associated with it.
For ease of use, I recommend that you give each server its own subdomain on the domain that you wish to use. You can use this guide to learn how to set up DNS subdomains using DigitalOcean's control panel.
For the purposes of this tutorial, we will refer to the components as being accessible at these subdomain:
  • Config Servers
    • config0.example.com
    • config1.example.com
    • config2.example.com
  • Query Routers
    • query0.example.com
    • query1.example.com
  • Shard Servers
    • shard0.example.com
    • shard1.example.com
    • shard2.example.com
    • shard3.example.com
If you do not set up subdomains, you can still follow along, but your configuration will not be as robust. If you wish to go this route, simply substitute the subdomain specifications with your droplet's IP address.

Initialize the Config Servers

The first components that must be set up are the configuration servers. These must be online and operational before the query routers or shards can be configured.
Log into your first configuration server as root.
The first thing we need to do is create a data directory, which is where the configuration server will store the metadata that associates location and content:
mkdir /mongo-metadata
Now, we simply have to start up the configuration server with the appropriate parameters. The service that provides the configuration server is called mongod. The default port number for this component is 27019.
We can start the configuration server with the following command:
mongod --configsvr --dbpath /mongo-metadata --port 27019
The server will start outputting information and will begin listening for connections from other components.
Repeat this process exactly on the other two configuration servers. The port number should be the same across all three servers.

Configure Query Router Instances

At this point, you should have all three of your configuration servers running and listening for connections. They must be operational before continuing.
Log into your first query router as root.
The first thing we need to do is stop the mongodb process on this instance if it is already running. The query routers use data locks that conflict with the main MongoDB process:
service mongodb stop
Next, we need to start the query router service with a specific configuration string. The configuration string must be exactly the same for every query router you configure (including the order of arguments). It is composed of the address of each configuration server and the port number it is operating on, separated by a comma.
They query router service is called mongos. The default port number for this process is 27017 (but the port number in the configuration refers to the configuration server port number, which is 27019 by default).
The end result is that the query router service is started with a string like this:
mongos --configdb config0.example.com:27019,config1.example.com:27019,config2.example.com:27019
Your first query router should begin to connect to the three configuration servers. Repeat these steps on the other query router. Remember that the mongodb service must be stopped prior to typing in the command.
Also, keep in mind that the exact same command must be used to start each query router. Failure to do so will result in an error.

Add Shards to the Cluster

Now that we have our configuration servers and query routers configured, we can begin adding the actual shard servers to our cluster. These shards will each hold a portion of the total data.
Log into one of your shard servers as root.
As we mentioned in the beginning, in this guide we will only be using single machine shards instead of replica sets. This is for the sake of brevity and simplicity of demonstration. In production environments, a replica set is very highly recommended in order to ensure the integrity and availability of the data. Toconfigure replica sets in MongoDB, follow this guide.
To actually add the shards to the cluster, we will need to go through the query routers, which are now configured to act as our interface with the cluster. We can do this by connecting to any of the query routers like this:
mongo --host query0.example.com --port 27017
This will connect to the appropriate query router and open a mongo prompt. We will add all of our shard servers from this prompt.
To add our first shard, type:
sh.addShard( "shard0.example.com:27017" )
You can then add your remaining shard droplets in this same interface. You do not need to log into each shard server individually.
sh.addShard( "shard1.example.com:27017" )
sh.addShard( "shard2.example.com:27017" )
sh.addShard( "shard3.example.com:27017" )
If you are configuring a production cluster, complete with replication sets, you have to instead specify the replication set name and a replication set member to establish each set as a distinct shard. The syntax would look something like this:
sh.addShard( "rep_set_name/rep_set_member:27017" )

How to Enable Sharding for a Database Collection

MongoDB organizes information into databases. Inside each database, data is further compartmentalized through "collections". A collection is akin to a table in traditional relational database models.
In this section, we will be operating using the querying routers again. If you are not still connected to the query router, you can access it again using the same mongo command you used in the last section:
mongo --host config0.example.com --port 27017

Enable Sharding on the Database Level

We will enable sharding first on the database level. To do this, we will create a test database called (appropriately) test_db.
To create this database, we simply need to change to it. It will be marked as our current database and created dynamically when we first enter data into it:
use test_db
We can check that we are currently using the database we just created by typing:
db
test_db
We can see all of the available databases by typing:
show dbs
You may notice that the database that we just created does not show up. This is because it holds no data so it is not quite real yet.
We can enable sharding on this database by issuing this command:
sh.enableSharding("test_db")
Again, if we enter the show dbs command, we will not see our new database. However, if we switch to the config database which is generated automatically, and issue a find() command, our new database will be returned:
use config
db.databases.find()
{ "_id" : "admin", "partitioned" : false, "primary" : "config" }
{ "_id" : "test_db", "partitioned" : true, "primary" : "shard0003" }
Your database will show up with the show dbs command when MongoDB has added some data to the new database.

Enable Sharding on the Collections Level

Now that our database is marked as being available for sharding, we can enable sharding on a specific collection.
At this point, we need to decide on a sharding strategy. Sharding works by organizing data into different categories based on a specific field designated as the shard key in the documents it is storing. It puts all of the documents that have a matching shard key on the same shard.
For instance, if your database is storing employees at a company and your shard key is based on favorite color, MongoDB will put all of the employees with blue in the favorite color field on a single shard. This can lead to disproportional storage if everybody likes a few colors.
A better choice for a shard key would be something that's guaranteed to be more evenly distributed. For instance, in a large company, a birthday (month and day) field would probably be fairly evenly distributed.
In cases where you're unsure about how things will be distributed, or there is no appropriate field, you can create a "hashed" shard key based on an existing field. This is what we will be doing for our data.
We can create a collection called test_collection and hash its "id" field. Make sure we're using our testdb database and then issue the command:
use test_db
db.test_collection.ensureIndex( { _id : "hashed" } )
We can then shard the collection by issuing this command:
sh.shardCollection("test_db.test_collection", { "_id": "hashed" } )
This will shard the collection across all of the available shards.

Insert Test Data into the Collection

We can see our sharding in action by using a loop to create some objects. This loop comes directly from the MongoDB website for generating test data.
We can insert data into the collection using a simple loop like this:
use test_db
for (var i = 1; i <= 500; i++) db.test_collection.insert( { x : i } )
This will create 500 simple documents ( only an ID field and an "x" field containing a number) and distribute them among the different shards. You can see the results by typing:
db.test_collection.find()
{ "_id" : ObjectId("529d082c488a806798cc30d3"), "x" : 6 }
{ "_id" : ObjectId("529d082c488a806798cc30d0"), "x" : 3 }
{ "_id" : ObjectId("529d082c488a806798cc30d2"), "x" : 5 }
{ "_id" : ObjectId("529d082c488a806798cc30ce"), "x" : 1 }
{ "_id" : ObjectId("529d082c488a806798cc30d6"), "x" : 9 }
{ "_id" : ObjectId("529d082c488a806798cc30d1"), "x" : 4 }
{ "_id" : ObjectId("529d082c488a806798cc30d8"), "x" : 11 }
. . .
To get more values, type:
it
{ "_id" : ObjectId("529d082c488a806798cc30cf"), "x" : 2 }
{ "_id" : ObjectId("529d082c488a806798cc30dd"), "x" : 16 }
{ "_id" : ObjectId("529d082c488a806798cc30d4"), "x" : 7 }
{ "_id" : ObjectId("529d082c488a806798cc30da"), "x" : 13 }
{ "_id" : ObjectId("529d082c488a806798cc30d5"), "x" : 8 }
{ "_id" : ObjectId("529d082c488a806798cc30de"), "x" : 17 }
{ "_id" : ObjectId("529d082c488a806798cc30db"), "x" : 14 }
{ "_id" : ObjectId("529d082c488a806798cc30e1"), "x" : 20 }
. . .
To get information about the specific shards, you can type:
sh.status()
--- Sharding Status --- 
  sharding version: {
    "_id" : 1,
    "version" : 3,
    "minCompatibleVersion" : 3,
    "currentVersion" : 4,
    "clusterId" : ObjectId("529cae0691365bef9308cd75")
}
  shards:
    {  "_id" : "shard0000",  "host" : "162.243.243.156:27017" }
    {  "_id" : "shard0001",  "host" : "162.243.243.155:27017" }
. . .
This will provide information about the chunks that MongoDB distributed between the shards.

Conclusion

By the end of this guide, you should be able to implement your own MongoDB sharding configuration. The specific configuration of your servers and the shard key that you choose for each collection will have a big impact on the performance of your cluster.
Choose the field or fields that have the best distribution properties and most closely represent the logical groupings that will be reflected in your database queries. If MongoDB only has to go to a single shard to retrieve your data, it will return faster.